
This will be an ever-expanding part of the site. Come here for information on a range of different things related to the practice of mixing drinks, like bar tools, garnishes, mixing techniques, etc. This will be updated irregularly, but hopefully the tips I provide will be useful to most amateurs. Once again, I’ll be writing these with the average person in mind. So, with any luck, some parts might just be more useful than a book on mixing drinks that ignores the fact that most readers are not professionals.
Check out any of the pages below for some fancy information that will hopefully make you a better mixologist. Unfortunately, you won’t be so good as to avoid that word.
Contents
Liquor Quality
The old saying is true: Buy cheap wine and expensive liquor (and do whatever the fuck you want when it comes to beer, I guess). When looking for liquor for your mixed drinks (or for anything), stay away from that bottom shelf. Cheap liquor can ruin a cocktail, even in small amounts. If you’re buying liquor for mixing, you’ll want to spend at about $12-$20 for a fifth (750 mL). So with vodka, for example, you won’t want anything cheaper than Smirnoff, but probably nothing more expensive than Absolut (allowing, of course, for a reasonable margin of error on the high end). If you have the money, you’re obviously welcome to use a more expensive liquor, but unless you’re making a cocktail that really emphasizes the unique flavor of the base liquor (say, a Martini or a Manhattan), you don’t want to be mixing your top shelf liquor. Otherwise, you’re just wasting that Crystal Head by putting it in a Long Island Iced Tea. Stick to the middle shelf when mixing drinks.
The exception to this rule, in my experience is liqueur. Cheap liqueur tastes fine and is appropriate for mixing. Feel free to use Arrow or DeKuyper for your basic liqueur needs, figure out which liqueurs you really like, and try more expensive brands as your funds allow.
A Note on Measurements
In every cocktail you ever make, the measurements are extremely important. That being said, you can look at five different cocktail books, and find five different measurements for something as simple as a Screwdriver. In the end, the measurements in a cocktail are to your taste. There might be an official version of the drink, but feel free to experiment, and find the balance you like. Of course, the standard measurements are standard for a reason, but that doesn’t mean you can’t find a version you like better.
Be careful, though, because if you vary it too much, you might wind up making something completely different; the difference between some drinks are the measurements or glassware (which affects the measurements).
Highballs Vs. Lowballs
When it comes to drinks on the rocks, most fall into either the category of highball or lowball. The main difference is that a highball is in a tall glass, and a lowball is in a short glass. The glasses come in different styles, but that’s basically what you need to know.
However, some things have changed, and many bars now serve classic highball drinks as lowballs. Examples include the Screwdriver, the Cape Codder, the Gin and Tonic, the Rum and Coke, and the list goes on. Even though you might think you’re getting less, if the bartender is making the drink right, you’re not getting less alcohol; you’re getting less mixer.
Most bartenders use and most recipes call for the same amount of liquor in these drinks whether they’re made with tall or short (the amount usually being 1 1/2 or 2 ounces). Therefore, the amount of mixer that goes into the drink is what changes. So yes, you are getting less if you get one of these in a lowball glass, but your drink will actually be stronger. If you still want the larger drink, simply ask for it tall.
On this site, when you see a drink on the rocks that ends with you filling up the glass with a mixer, you’re usually free to make that in either a short or tall glass. Some exceptions apply (most dairy drinks on the rocks are always short), but know that you have some room in selecting your glassware.
Using Ice
With every cocktail you ever make, if it includes ice in the final glass, fill the glass completely. This is a mistake that a lot of people make. Filling the glass all the way keeps the drink at the proper temperature, releases the proper amount of water to help the ingredients blend, and allows for the correct drink proportions in some cases. Don’t worry about it watering down your drink — it will melt a lot slower than smaller amounts of ice. You’ll actually wind up with a stronger drink if you use more ice.
The other time you’ll be using ice is with shaken and stirred drinks that you then strain into your serving glass. This process isn’t to mix the drink, but to cool it down and once again to release a small amount of water to help the ingredients blend (this is why you should still stir or shake a drink with ice even if you’ve chilled all of your ingredients beforehand — hat small bit of water is essential). In these cases, fill up your mixing glass or shaker anywhere from half the way full to all the way full with ice. Some recipes might specify how much ice to use at this stage, but generally you’ll be alright if you stay in this neighborhood.
Clear/Glass Ice
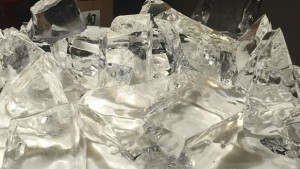 Clear ice makes a surprisingly big difference in making the perfect cocktail. The ice takes forever to melt and makes the cocktail taste and look more beautiful than it ever could with traditional ice. It is the only way I drink anything on the rocks anymore. It is a bit of work, but so is anything worth doing.
When ice freezes from all sides in, like a normal ice tray in the freezer, gas bubbles are trapped in the center resulting in ugly cloudy ice that is not very dense and melts quickly. When ice freezes from one direction to another (top down) like a lake in winter, it creates a layer of perfectly clear, glass quality ice. Essentially you are creating a miniature version of a lake freezing over during the winter.
This is achieved a couple of different ways. Wintersmiths Ice Baller uses directional freezing to make clear ice spheres in your freezer. I have one and they work amazing but are a little bit pricey at $85. There are some cheaper/free methods but they require a bit more work. One free method of making glass quality ice is using coolers. You will need access to a walk in freezer or have it be freezing outside for this though. Put clean warm water in a clean cooler and set in the cooler or outside for about 48 hours or until most of the water is frozen. You will then have a layer of ice over water, or a solid block of ice with a top, glass quality layer and a lower cloudy layer if you leave it out longer and the water freezes completely. You can then score and break this up into manageable chunks. If you are handy with a chisel you can make some decent ice spheres from this as well. If you have the time you will want to use distilled water and boil it. This tends to get rid of more of the air bubbles that causes ice to be cloudy. Alcademics has a great write up with visuals on this if this is something you want to try.
